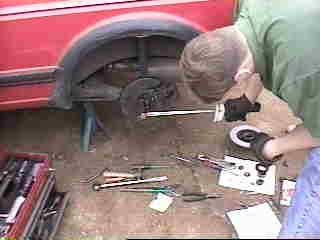
| For this job, you will need some basic hand tools. These are things most DIYers should already have. As you can see, there is a 8mm hex key, 15mm socket, socket extension, vice grips, pliers, a few screwdrivers, small hammer, torque wrench and a couple of wrenches. Not seen are jack stands, Loc-tite (thread lock), Dr. Pepper (chilled), girlfriend (with cam), CD player and pet dogs. | 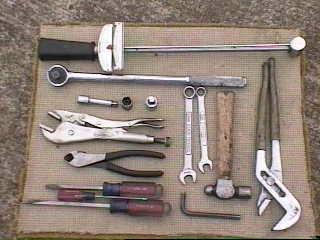 |
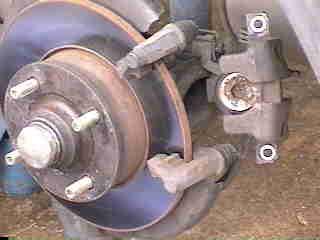 |
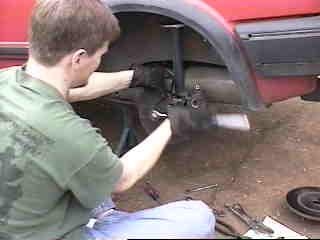
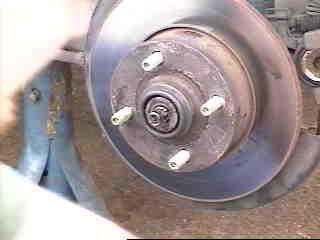
Now that you've got the wheel off, remove the rear brakes. I have disc brakes on the rear, and that makes the job just a little harder. Truth be told, this is the hardest shim job of all the cars I've done... VWs with rear disc brakes... you do this, you can do any of them really easy. |
| Here is a underside/back view of the car. You will need to remove those 2 bolts with the hex key. | 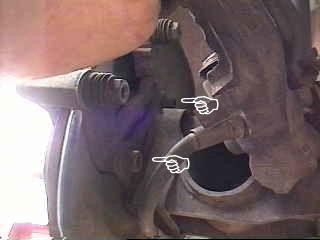 |
 |
Those 2 bolts will be pretty tight to remove (as they should be), so some extra leverage will be needed. |
| Now that you've gotten the 2 bolts out and removed the bracket, you are ready to remove the rotor. I used the channel locks to remove the dust cap, the wire cutters to pull out the cotter pin, and now the vice grips to remove the nut. This is easy, isn't it? | 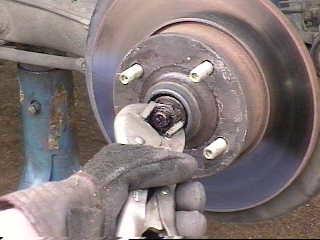 |
 |
As you take things apart, place them on a clean surface. A paper towel works fine. You do not want dirt and grime getting into your bearings. This would be a good time to clean and repack your bearings too. |
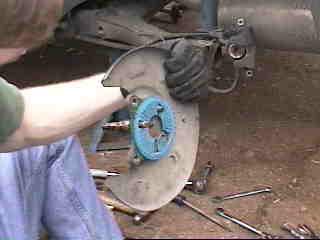
| With the rotor removed, you will see a small tin dust seal on the spindle, using a screw driver to gently work it off of the spindle. Once you remove that, you will see 4 bolts, these are what hold the spindle to the axle beam. | 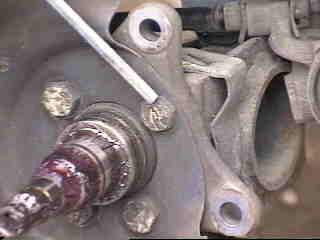 |
 |
With the 15mm socket in place, remove those 4 bolts. Hold on to the spindle when you remove the last bolt so it doesn't drop. There are washers that are on the bolts, remove and discard those washers. If you use them when you put everything back together with the shim installed you can run into problems, I'll explain later. |
| And here is the mounting plate of the axle beam. Now here can be a tricky part, if there is a lot of rust between the mounting plate and spindle, that can mess with your change in the alignment. Sometimes you have to clean the 2 parts with a wire brush, put the car back together and get another alignment reading. Without clean flat surfaces for the shim to make contact with, you can not predict the amount of alignment change. Luckily, my car was fine. If you are going to be doing rear brakes soon, why not go ahead and pull the spindle and clean them out, then if you get the alignment check out later on, you will not have to worry about it. | 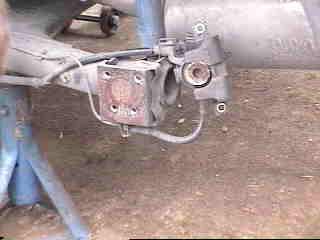 |
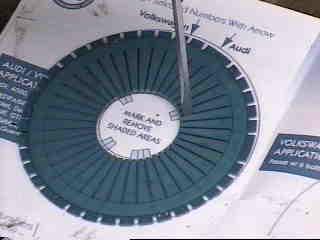
| This is the Specialty Products Co EZ Shim that is needed for my car. They come in 3 different flavors (red, gray and blue) for different makes and models of cars. All VWs use the blue one which is part number 75200. What makes these shims so nice is that with this 1 shim, I have hundreds of possible camber/toe changes. Other shims on the market would require me to stock hundreds of different types of shims because of different angle changes needed, along with the different styles needed for various makes of cars that might come into the shop. |
| Using the chart that comes with the shim, find the amount of camber and toe change that is needed. Where the toe change and camber change meet in a box will be 2 numbers, you simply dial the shim to those numbers. If there isn't a set of numbers for the amount of change you are wanting, select a different camber change since toe is more important. | 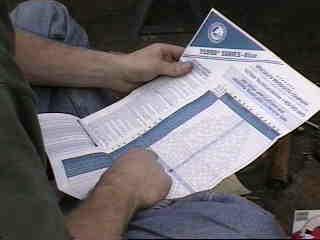 |
 |
On the back of the chart that comes with the shim are the templates. With the numbers dialed in, lay the shim over the template for VWs with the numbers under the VW arrow. You will then want to remove the shaded areas from the shim. I'm using a small screw driver to punch thru the shim a little, then was able to "tear" them out with my hands. Easy enough. |
| Double checking my work, I now have a shim ready to be installed back into my GTi. | 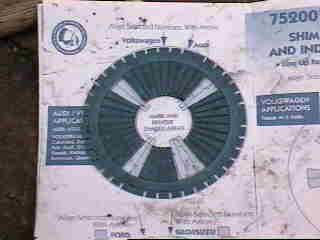 |
| Here you can see how the shim is lined up with the bolt holes. Some VERY important things to note here, the 2 reference numbers that I got from the chart and dialed in on the shim, those numbers are at the "top" of the shim. Also, when you install these shims on the left side (driver side) of the car, the numbers MUST face towards the axle beam's mounting plate. When you install these shims on the right side (passenger side) of the car, the numbers MUST face away from the axle beam's mounting plate! |
| When you're ready to start putting things back together, you will need to put a few drops of Loc-Tite on the 4 bolts and in the bolt holes of the mounting plate. Those bolts will only be torqued to 45 ft lbs, so failure to use Loc-Tite can cause the wheel to leave the car as you drive. | 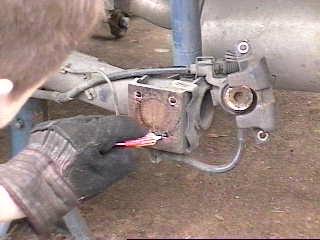 |
 |
I've taken the spindle, placed the splash guard on it (making sure I hvae it facing the right way... I've put the splash gauge on backwards before), then the top 2 bolts and the shim. |
| Line the 2 bolts up with the bolt holes and start them by hand. Once you get the first 2 in, the bottom 2 bolts line up without any problems. Remember, you are not using the washers that were on the bolts. The bolts are just barely long enuff to go all the way thru the mounting plate when you install these shims. If you use the washers, that is more "thickness" that the bolt has to go thru, so it wont get as much thread bite. | 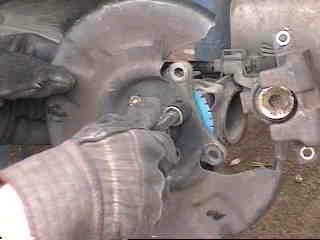 |
 |
Slowly tighten up the bolts using the same pattern you do with a car tire. I get them snug first, then tighten them to 20-25 fl lbs, then 35 ft lbs and finally 45 ft lbs. If you tighten 1 bolt right up to 45 ft lbs, you can distort the shim (squish it) and screw up the alignment change. Notice that torque wrenches do not have any air line hoses in them. |
| Once the 4 spindle bolts are tight, you can use a hammer to gently tap the tin dust seal back in place. | 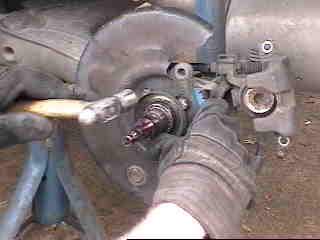 |
 |
While putting the rotor back on, I went ahead and re packed the bearing with fresh clean grease since I had everything apart. I also inspected the rear grease seal in the rotor to make sure it was in good shape. |
| Just because it is a big nut doesn't mean you have to tighten it as tight as you can get it. You want to have it snug at best. When you put the wheel back on, you should be able to jiggle it just a hair. The bearings get hot and expand when you drive. If you have them to tight, they won't have room to expand. If you are unsure as to how tight to tighten them, then use your bare hands and get them about as snug as you can.... unless you are He-Man, you should over tighten them with your fingers. The retainer and cotter pin will keep it from coming loose. Replace dust cap and you're done! | 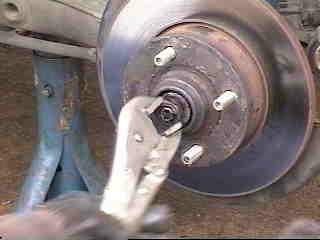 |

Why should you send a postcard? Because it is cheap to do and as we all know, the US Post Office is funding it's Super Muntant Army Project with fees from postcards stamps. I would really like to see a Super Muntant Army deliever my mail in the near future.
Thank you.
