A2 Front Brakes
This is for those who have never done front brakes on a VW before. This Step-By-Step was done on my 87 Jetta GL, a pretty stock car as far as things go. I paid $600 for it and have been smoothing out a few rough edges on it. One of the problem areas that needed to be addressed were the front brakes. The rotors were very thin and the pads were about to make metal on metal contact. Time for some all important brake work. This Step-By-Step is geared for someone who knows how to rotate tires or change the oil and is ready to move up to the next level.
Please note that your car may vary from my car, so some things will be a little different, but over all, it is the same for any given VW
Ye tools needed:
- 6mm hex key or hex drive socket and ratchet
- large C-clamp or C-clamp pliers
- Silicone paste or anti-seize paste
- jack and jack stands
- large screw driver
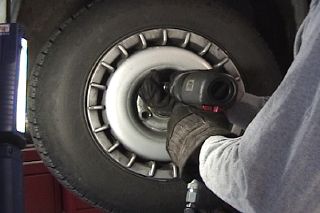 |
As always, safely life your VW off the ground. Sure it helps to have a shop lift, air tools and a tool box full of tools, but for a job like this, a jack and jack stands will get the car off the ground and only a few hand tools are all that are needed. |
| On my VW here, the caliper is held onto the bearing housing via two 6mm cap screws. So with my trust 6mm hex mounted up onto the Craftsman ratchet, I remove the two cap screws. Please note the two cap screws are not the same length. |  |
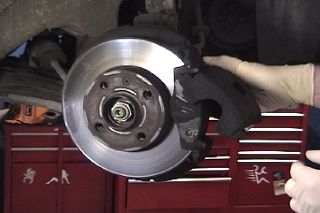 |
With the two cap screws remove, pry the caliper off, starting at the bottom and remove the caliper. |
| Remove the old brake pads and hardware. Sometimes you will have to use a screwdriver to help remove them. | 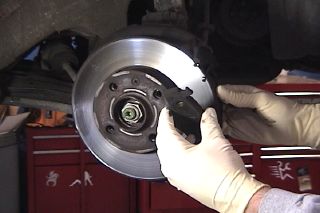 |
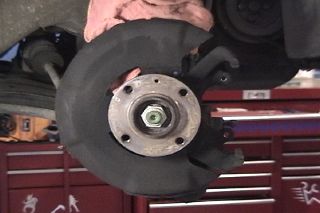 |
Remove that damn screw and take the rotor off. If your rotors are in fairly good shape and are above minium spec for thickness, then you can have them turned (machined). If they are really thin like the ones that were on my Jetta here, then toss them out for scrap metal and installed a new pair of rotors. The rotor will have cast into it the minimum thickness spec. This spec is what you should have after turning a rotor. With the A2 VWs, it is best to have a fresh surface when replacing the pad. Now is a good time to clean up the surface that the brake pads were fitted to. A simple wire brush will clean off any crud and scale. |
| To get the piston back into the caliper, I use a large pair of Vise Grip brand 11" C-clamp locking pliers. You can also use a regular large C-clamp to push the piston back in. Please note that rear disc brake calipers are not the same as the front and this method will not push the piston back in. If a car has ABS brakes, one would be wise to clamp off the rubber brake hose, open the bleeder screw then push the piston back in. This is to avoid pushing crud that is in the brake fluid up into the ABS module and cause internial damage (not cheap). | 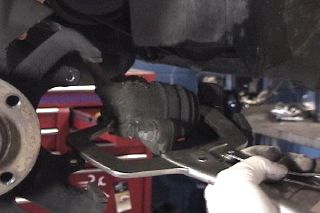 |
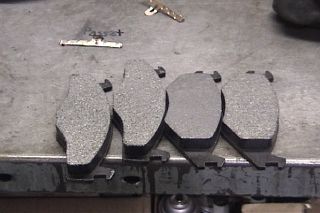 |
OK, lets take a look at the new brake pads. I'm going with some Metal Master pads. Notice that ther are 2 types of pads, the larger ones go on the outer most side of the rotors, the smallers ones go on the inside of the rotors. |
| Using plain ol' silicone paste, coat the metal backing plate of the brake pads. This will help eleminate annoying brake squeel. Brake squeel is causes by the brake pads vibrating. You can also use that grey anti-sieze stuff that can be found at any auto parts store. A thin layer is all that is needed. |  |
 |
While we have the silicone paste out, lets give the hardware some much needed attention. The cap screws that hold the calipers in place go though metal tubes. The caliper "floats" on these metal tubes. Remove them from the caliper, clean them up and lube them up with the paste, and do the same to the insides of the rubber bushings on the calipers. |
| While that damn screw is not required, it does help keep the rotor in check while you put everything together, so it does serve some good, but if don't have it, then it isn't a big deal. These rotors are the very same rotors from my wife's Jetta a couple of years ago when I did the "damn screw" section. I turned them, then used a die grinder with a scuff pad on them to give them a swirl finish. I had sprayed oil on them and kept them in plastic bags all this time. Before I mounted them, I washed off all the oil with brake cleaner. You can purchase spray cans of brake cleaner at any auto parts store. Oil and metal dust are things you don't want on rotors when doing a brake job. | 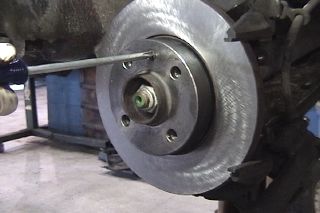 |
 |
New anti rattle clips are always a good idea when doing brakes here.... |
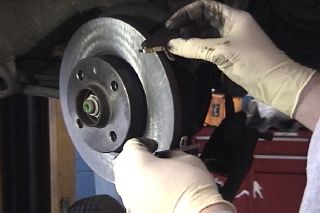
| Now this looks easy to do, but it is one of those 3 handed jobs. Well 2 hands if you don't mind cursing a little. This shows the how the bigger brake pad is on the outside and the small brake pad is on the inside (closer to the CV boot). Again, please note how the anti rattle clips are installed so the tabs on them are over the brake rotor. | 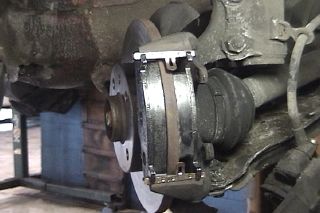 |
 |
When you put the caliper back on, slip the top half into place first and then roll the bottom in. Put the two cap screws back in and tighten dowwn. After you have the wheels mounted up and the car is on the ground, you will need to pump up the brake pedal until you get a firm pedal. Also, new brake pads will have to seat in some before they get some "bite" to them, so be aware that that first stop isn't going to be as good as it use to be. It took my Jetta about 30-ish miles for the brake to return to a normal feel. |
A few quick footnotes here... A1, A2 and A3 VWs are pretty much the same. Some VWs (and most other cars for that matter) have a "bridge" that the brake pads are on and the caliper bolts up to the bridge as well. A bridge, in simple terms, is a bracket. There will be 2 bolts that mount it up to the wheel bearing housing (17mm bolts on VWs). This bridge will need to be removed to get the rotor off the car, and the hardware will be different on brakes with a bridge than the anti rattle clips shown here.
Again, turning rotors, IMHO, is always a good idea to do on A1, A2 and A3 VWs. A4s have rotors that can not be turned and I think this due to reduced emmision laws (I'm not joking here). In a nutshell, thinner rotors means reduced mass, which means less effort from the engine to get the car rolling = lower emmisions. If you see cracked brake lines or brake fluid leaks, then REPLACE THE FAILED PART(S).
Brake work on older cars is fairly simple to do, but always keep in mind that a crappy brake job can be bad for radiators.
Lastly, new brakes will take a little time to seat into to place. For the first 30-ish mile I drove the Jetta, the brakes didn't work as good, but as the pads seated with the rotors, they got better and better.
Click here to vote for my site if you find the info useful. Thank you.

All Step-By-Steps use Postcard-ware fees, if you find the info useful, then please send a postcard to:
4130 Products
740 Schenley Rd
Knoxville, TN 37923
4130 Products
740 Schenley Rd
Knoxville, TN 37923
Why should you send a postcard? Because it is cheap to do and as we all know, the US Post Office is funding it's Super Muntant Army Project with fees from postcards stamps. I would really like to see a Super Muntant Army deliever my mail in the near future.
Thank you.